Friday 3 November 2017

{Recipe}Ananas Sansav/Pineapple Sansav

Sansav is sweet and Tangy curry prepared in Goa by using Ambade (Hog Plum)/small ripe mangoes or pineapple. Sansav is loved by every one from kids to elders to old.The Tangy ,spicy and sweet taste of the sansav makes every one lick their fingers. In Goa mostly Ambade sansav is included in the festival menu of Ganesh Chaturthi and Diwali.

 My Mom prepares the best sansav and its  my all time favourite.Being in Bangalore its was little difficult to find ambade,so today i tried to substitute ambade(hog plum) with pineapple. So lets begin with ananas sansav. 

Servings 4
Total Preparation Time :30 min
Cooking Time : 15 min

Ingredients
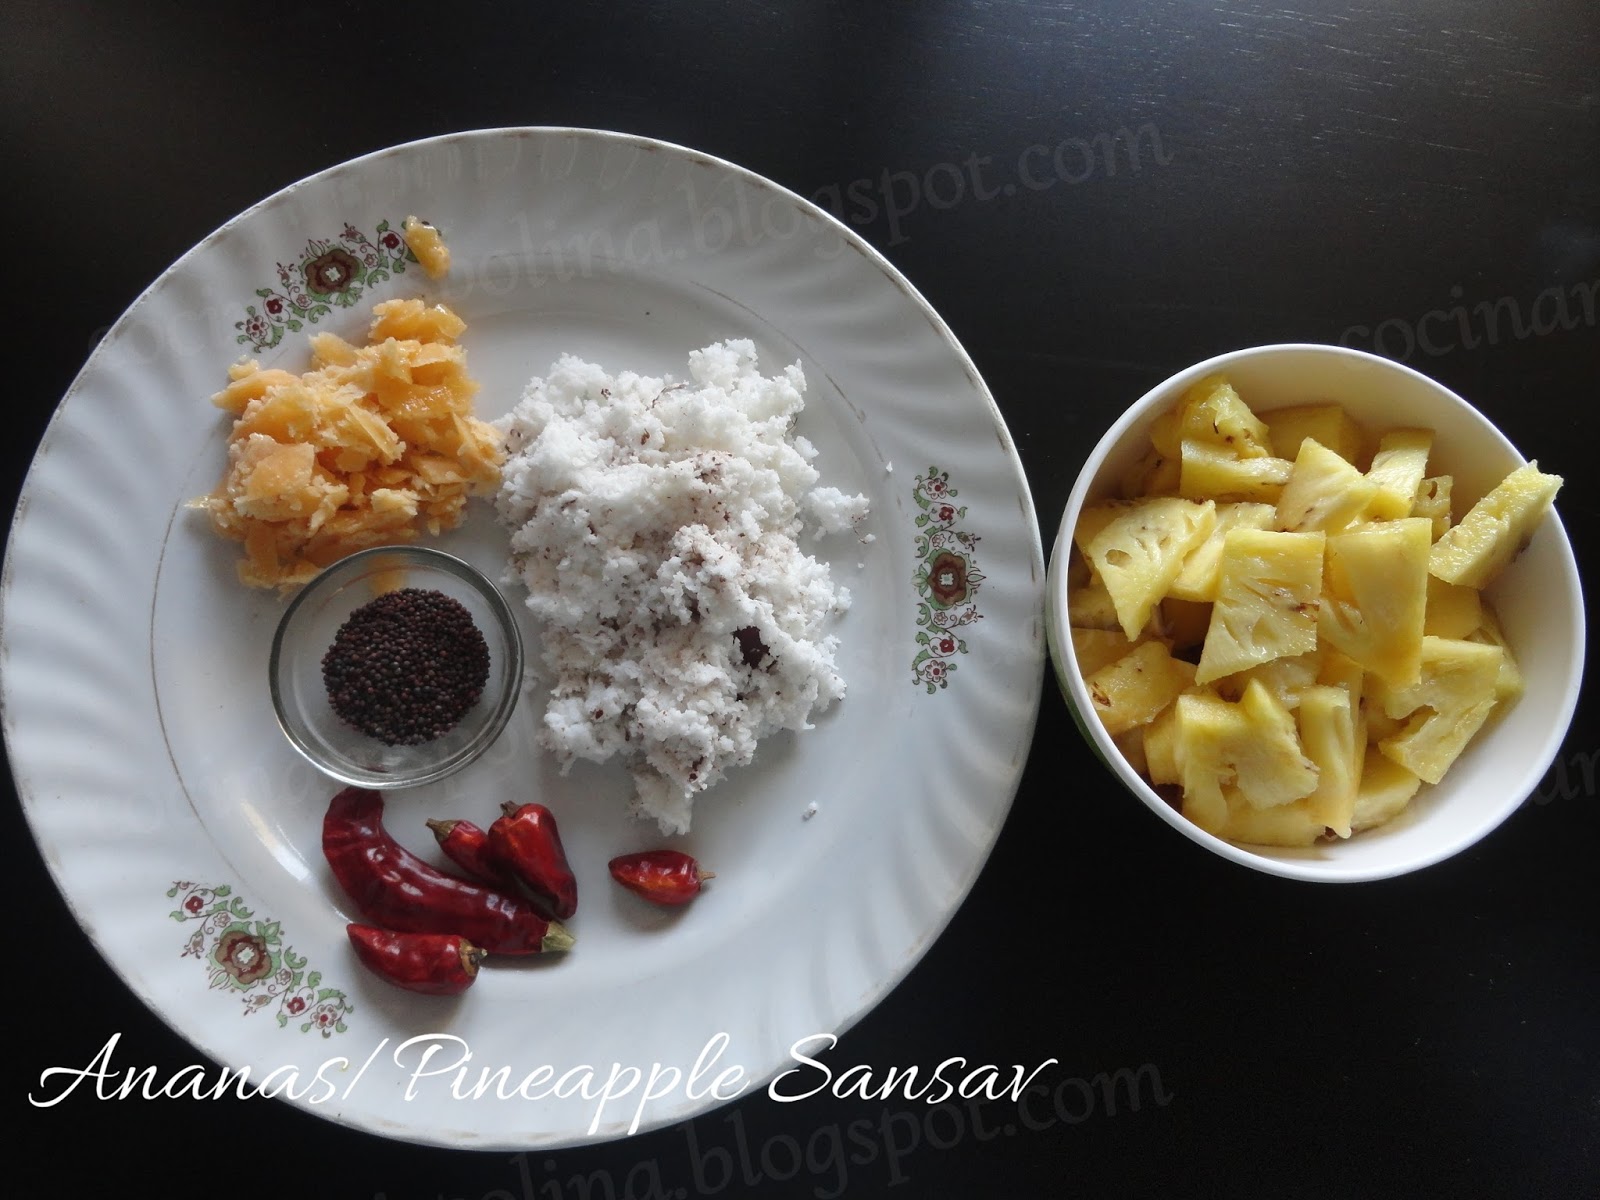
1 Small pineapple cleaned and cut unto cubes
1/2 small coconut scrapped
1/2 Tablespoon mustard seed
4-5 dry chilies
1 Table spoon jaggery grated
Curry leaves
Salt as per taste
Oil

Method
1)Take a nice ripped pineapple and clean it and cut into Cubes.Also arrange all ingredients to be ground in one plate.

2)Then ground coconut,dry chilies,jaggery into fine paste.Then at the last grind add a tsp of mustard to the mixture and just give one grind.
3)Then pan add little oil,once heated add tsp of mustard seeds and curry leaves.Then add the pineapple cubes and toss well.
4)Add the ground coconut paste and mix well in the pineapple .Also add salt as per taste and add also water if required and cook on slow flame for 10 min.
5)After 10 min you will see the colour changing to little brighter.Sine i used small dry chilies which do not have much of colour but only spice.So you can use chilies which gives colour.
6)Serve with hot rice as side dish ,its just yum.


Thank you for Visiting My Blog Cocinanispolina.

Do follow me on Facebook Page :@cocinanispolina
On Instagram : @cocinanispolina

Do share your comments and feedback.Can also share the dish pic if you try recipe from my Blog.

Happy Cooking :)

Thursday 26 October 2017

{Recipe}Corn Batata Vada /Corn Potato Fritters


Batata Vada is again one of the Indian street food and more famous in streets of Mumbai.Its literally means potato fritters.The name Batata means potato in Portuguese who introduced potatoes to India. Batata Vada consist of potato bhaji smashed coated with chick pea flour and than deep fried and served with hot spicy green chutneys or and other savory chutneys including tomato ketchup.But Today batata vada is with twist and i have hidden some boiled sweet corns in it.The sweet corn bites really gives different taste to the batata vada.

The process of making potato bhaji remains the same like which involves seasoning of boiled potatoes with onions,mustard,green chilies,crushed ginger garlic and coriander leaves in addition to it will be sweet corn kernels to the boiled potatoes.If kids in house try to prepare two different stuffing one with mild and other one with extra green chilies because as all you know batata vada is awesome when its pipping hot and spicy to compliment the hot cup of Tea.Lets begin with corn potato fritters.

Ingredients
For Potato Mash/Bhaji
4-6 Medium boiled potatoes
1 Cup of boiled sweet corn kernels
2 Medium onions chopped finely
2-3 Green Chilies chopped
1 Tsp of garlic chopped
1 Tsp of Ginger chopped
1 tsp mustard seeds
5-6 Curry leaves
1/2 Tsp Turmeric powder
Green coriander for garnishing
Salt as per taste

For Chick pea Batter
150-200 gram Chick pea flour
1/2 Tsp chili powder
Salt for Taste
Oil for Deep frying

Method

1)First mix chick pea in a bowl ,add in it salt,pinch of turmeric powder,chili powder and mix well,than add little water and make thick paste,consistency should be in such a way that the batter should coat the potatoes well .(do not make watery).Keep aside for rest for 15 min.
2)On the other side mash potatoes well,in mashed potatoes add corns and mash again and keep aside.In deep pan add oil,once heated add mustard,once it starts to splatter add curry leaves,green chilies ,and ginger garlic chopped ,saute well,than add chopped onions and again saute for 1-2 min.Than add turmeric powder,salt as per taste and the mashed potatoes and corn mixture.Mix well until the potatoes and the seasoning gets combined well.Cover and cook on low flame for 1-2 min.open the lid,add the chopped coriander and mix well.Off the stove and keep the potato corn bhaji to cool down.

3)Once bhaji is cooled then make  roundels  and place in plate.For best result you can place the vada roundels in refrigerator for 5 min.
4)Meanwhile place the pan on stove once heated add oil for deep frying.Allow the oil to heat well so vada's will fry well.

5)Then take each potato corn roundels and roll in the chick pea batter and make sure its coated well with the batter and then deep fry .fry well until the outer cover is little crisp.If you feel oil is over heated reduce to medium and fry the vada's or else it will burn.

6)once vada's fried then place it on kitchen tissue to observe extra oil.Server hot with you evening chai /Tea and deep you can use green chutney or tomato sauce or ketchup. 
 Thank you for Visiting My Blog Cocinanispolina.

Do follow me on Facebook Page :@cocinanispolina
On Instagram : @cocinanispolina

Do share your comments and feedback.Can also share the dish pic if you try recipe from my Blog.

Happy Cooking :)

Wednesday 18 October 2017

{Recipe} Goan Pork Vindalho

"Pork Vindalho"yet again one of the authentic recipes from goan cuisine .Pork Vindalho is the must dish during festivals and celebrations because it is loved and relished by all.Also its very simple dish which only required few hours of marination with little spices and then just place the pot on the stove and leave the dish to cook on slow flame,see no handwork at all and the dish is done.
The most attracting part of the dish is the bright red colour which makes you salivate once you see the dish and also the aromatic essence will make you just lick your fingers.So let begin with fiery Pork Vindalho recipe.

Servings 6-8 
Total Preparation Time : Overnight +Cooking
Cooking Time : 40 to 60 min

Ingredients
1 Kilo Gram Pork(Cut into cubes)
4 Large Onions slices
2 Green Chilies slit
Salt as per salt
1 Tsp Sugar

Below Ingredients Grind into fine paste
15 Kashmiri Chilies
2 Tsp Cumin
1 Tsp Turmeric
10-15 Garlic cloves
1 Inch Ginger
2 Cinnamon stick
6 Cloves
10 Pepper Corns
Toddy Vinegar to grind

Step wise Method
1)Wash the pork well and dry it using kitchen towel,Make sure no water in pork.Apply salt and keep aside until you grind the vindalho masala.
2)Then Grind all the above mentioned ingredients using vinegar into fine paste.
3)Then spread the red vindalho masala over the pork.
4)Add onions and mix the pork well in the masala. Marinate at least for 3-4 hours and for best result marinate overnight.This marination process will help masala penetrate into the pork.
5)Next morning transfer the marinated pork into a mud pot or a nice nonstick pan and just place on slow flame and cook for about 30 min.Make sure to cover the lid and stir occasionally.
6)After 20 or 30 min you will see the vindalho as below.Add 1 tsp sugar,salt as per taste and stir well.
7)Cook for more 10 min or until the water is maximum dried and its done. Then enjoy the Goan fiery Vindalho with goan pao or rice.Server with Fresh green chili slit on top.

 Thank you for Visiting My Blog Cocinanispolina.

Do follow me on Facebook Page :@cocinanispolina
On Instagram : @cocinanispolina

Do share your comments and feedback.Can also share the dish pic if you try recipe from my Blog.

Happy Cooking :)

Friday 13 October 2017

{Recipe}Prawn Balchao (Goan Prawn pickle)

Prawn Balchao is Prawn pickle with spicy,sweet and tangy flavour.  Balchao you can term as pickling of sea food or meat which you can preserve for at least for 6 months and consume without reheating :) But ,among fish prawn balchao is most commonly prepared because most of them just love it.The colour and the aroma of the dish is mind boggling !


Prawn Balchao is best option when we stay away from family or when we do not have fish is home. Balchao you can just enjoy as side dish with rice or just take some slice bread or pao and just spread over and relish the sweet,spicy and tangy flavour of Goan Cuisine.So guys here i come with Prawn balchao recipe for those guys who are away from homes and for those who want to learn Balchao recipe.You can substitute your favourite seafood or meat and prepare balchao of your choice.
Servings 1 Kg Bottle
Total Preparation Time :40 Min
Cooking Time :30 min


Ingredients
1 kg Prawns(shrimps)
2 large onions
10-15 Curry leaves
2 Table spoon Sugar
salt to taste
1 Cup or as required oil as required

(Make paste of below ingredients using vinegar)
50 Kashmiri Red chilies
2 Large pods of Garlic
5 inch ginger
1 1/2 Tsp of Turmeric
11/2 table spoon Cumin seeds
1 table spoon  pepper corns
1 table spoon cloves
2 sticks of cinnamon
1 small ball of tamarind
Goan vinegar to grind

Step wise Method of cooking Prawn Balchao
1)First clean the prawns (so if you have 1 kg uncleaned prawns then after cleaning it will reduce to 500 or 600 gram)wash well,if prawns are bigger in size then cut them into small pieces and then apply salt and turmeric and keep aside.
2)Then Arrange all the ingredients required for grinding.Then Grind these all using vinegar into fine paste and keep aside.
3)Then add oil in pan,once heated add the marinated prawns and fry well.Once fried well remove from the oil and keep it in plate.
4)Fried prawns will look like below.
5)In the same pan which we fried prawns add curry leaves and onions chopped.Fry the onions on slow flame until translucent.
6)Add the ground red masala and fry well.Then allow the masala to cook well on slow flame may be for about 10-15 min.
7)Then add the fried prawns and stir well.Add 2 table spoon of sugar and salt as required.You can add vinegar also if required.Cook the balchao for more 10-15 min until you see the oil floating on top.
8)Allow the balchao to cool down and then transfer it to glass jar and let it mature for a week at room temperature.After a week its ready to gobbled .Best to serve as side dish with steamed rice ,chapati or Bread.
Thank you for Visiting My Blog Cocinanispolina.

Do follow me on Facebook Page :@cocinanispolina
On Instagram : @cocinanispolina

Do share your comments and feedback.Can also share the dish pic if you try recipe from my Blog.

Happy Cooking :)

Friday 6 October 2017

{Recipe}Paneer and Green peas penne pasta

Today's recipe Paneer and green peas penne pasta.Thought of getting some twist in this Italian cuisine. Wanted to add extra nutrients to the normal pasta so added my son's favourite Paneer(cottage cheese) and peas too.This twist really turned to be yum .Few pasta recipes on my blog are Creamy Macaroni Chicken Pasta,Spaghetti Pasta with Chicken and veggies,Spinach and corn elbow pasta recipe,Broccoli Pasta,Colourful Pasta Recipe ,Elbows Pasta cooked in minced lamp and green peas ,Broccoli and spring onion penne pasta Recipe,Penne Pasta in white sauce  and there more .

Ingredients
100 Gram Penne pasta boiled
100 Gram Paneer cubes
1/2 Cup Green peas frozen or fresh
3 Tomatoes Blanched and chopped
1 Onion chopped
1 Tsp chili powder
1 Tsp Garam masala
2 Table spoon Tomato sauce
1/2 Tsp oregano
1 Tsp fresh cream
1 Tsp Butter
Olive oil

Method
1)First to boil the pasta add water to a pan along with oil and salt.Then add the pasta and cook for about 10 min or until its cooked well.Do not over cook the pasta.Drain the water and keep aside.
2)Then add butter in pan and fry the paneer till little light brown and keep aside.

3)In other pan add little butter and olive oil.once heated add onions and saute for 1 min.Then add chopped tomatoes,green peas and mix well.Then add tomato sauce, chili powder ,salt as per taste and garam masala and mix well.Cover the pan and cook for 2 min.Then add paneer,oregano,little cream.
4)Add the boiled pasta and mix well .Cover and can cook for 1 min.Since its paneer based pasta so did not add cheese.Once done serve hot for breakfast or dinner.
Thank you for Visiting My Blog Cocinanispolina.

Do follow me on Facebook Page :@cocinanispolina
On Instagram : @cocinanispolina

Do share your comments and feedback.Can also share the dish pic if you try recipe from my Blog.

Happy Cooking :)

Wednesday 4 October 2017

{Recipe}Red Chicken Korma

Red chicken korma is simple chicken curry prepared using powdered spices and few dry spices along with curd for thickening the curry.When there is less time to decide on what to cook specially on busy Sunday,then this red chicken korma is the best recipe to prepare.It takes really little time to prepare and also with less ingredients..
Having these kind of easy recipes of non-veg really makes cooking simpler specially on those busy and sometimes lazy weekends.As we know otherwise non-veg dishes always takes advance preparation because of marinating process.So lets begin with one more quick recipe of Chicken.

Servings 4-5
 Preparation Time : 10 min
Cooking Time : 20 min

Ingredients
500 Gram Chicken pieces
1 Cup Curd
2 Large Onions
10 Garlic flakes
1 Table Spoon Coriander powder
1 Table Spoon chili powder
1 Tsp Turmeric powder
10 Cloves
3-4 Cardamom
10 pepper corns
Salt as per taste
Oil for Frying

Method 

1)Clean the chicken pieces well and drain all the excess water and add salt and lemon .Then arrange all the ingredients required.
2)Then grind the onions and garlic into fine paste.On the other side place the pan on stove,then add oil and once oil is heated add the chopped onion and garlic paste.Fry the paste well.
3)Add the powdered spices and dry whole spices and mix well.Again cook the mixture for about 5 minutes and make sure you can see little oil floating over the masala ,this means the masala is cooked well and not raw.This point you can add the chicken and stir well in the masala.
4)Then add curd into the chicken and mix well.And then cook on slow flame for 15 min.Keep stirring in between so that it doesn't stick to the pan.
5)Once you see oil floating on the gravy then you can switch of the stove and your red chicken korma is all done.Serve the gravy with hot roti's.

Thank you for Visiting My Blog Cocinanispolina.

Do follow me on Facebook Page :@cocinanispolina
On Instagram : @cocinanispolina

Do share your comments and feedback.Can also share the dish pic if you try recipe from my Blog.

Happy Cooking :)

Monday 4 September 2017

{Recipe} Chicken Dum Biryani

Today presenting the step wise preparation of Indian Chicken Dum biryani. Earlier if you check on my blog  you will find Boneless Chicken Biryani,Mutton Biryani and now its Chicken Dum Biryani recipe. If we go back in history the word Biryani is derived from Persian language,one theory of word is arrived from brinj which means rice in Persian and other word is derived from biryani which means to fry or roast.

When we speak about ingredients the history explains that main commonly used rice is long grain rice that is basmati,but in some part of India zeera rice is also used in cooking biryani. The other ingredients includes dry whole spices like cinnamon,cardamom,cloves,pepper corns,ginger-garlic,green chilies,green coriander,mint,The premium ingredients include saffron.For non-vegetarians biryani main ingredients that accomplishes spices is the meat,chicken and mutton. Biryani can be served with yogurt raitaSweet &yogurt corn raita .


Generally Biryani is prepared by using whole spices but today i have used powder of dry masala's which gives the biryani more flavour and its not wasted.Also i have used just one layer for dum that is base chicken layer and then directly rice.In my earlier recipes you will find pre -cooking of chicken or mutton and then doing the dum but this recipe no precooking involves its only marination for overnight and then direct on Dum which is also called as kachi style . So lets begin with the recipe for Chicken dum biryani.

Servings 8-10
Total Preparation Time : overnight marination + 35 min
Cooking Time :35 min

Ingredients
2 Kg Chicken
700 Gram Basmati rice
250 Gram Curd
3 Table Spoon Ginger garlic paste
3 Tablespoon red chili powder
1 Tsp Turmeric powder
11/2 Tablespoon Coriander powder
1 Tablespoon Cumin Powder
100 Gram oil
1 Tablespoon rose water
1 Bowl full of chopped fresh coriander and Mint
6 Green chopped chilies

Biryani Masala (Below spices grind in to rough powder)
1 Large bay leaf
2 Cinnamon sticks
15 Cloves
5 Ilaichi/Cardamom
15 pepper corns
1 Tablespoon pathar phool/Dagad phool/Black stone Flower
2 Mace/Javitri
2 Tsp Shahi Zeera

Other ingredients
4 Fried onions
4 Table spoon ghee
1 Lemon juice extract
1 Tsp Rosewater for sprinkle
1 Tsp of orange colour
1 Tsp Green colour
Salt as per taste

Step wise method for Dum biryani

1.Take chicken in bowl and wash well.Drain all the water from the chicken or you can towel dry it using kitchen towel.

2.Then one by one start adding the ingredients .So will start with first add salt,ginger/garlic paste,curd,turmeric powder,chili powder,cumin powder,coriander powder,biryani masala ground,oil,rose water,chopped coriander,mint and green chilies.Mix all the ingredients well and marinate for overnight.
3.Next day when you start the biryani process then first start with soaking of basmati rice for at least 45 to 60 min.Then in large pan add water n bring to boil,also add few cloves ,pepper corns and bay leaf along with salt and tsp of oil.The add soaked rice and half cook the rice.
 4.Then arrange the marinated chicken pieces in the vessel which you will cook the biryani. Then arrange the 1/2 cooked rice over the chicken .
5.Then over the rice layer sprinkle the orange and green edible food colours,fried onions,ghee,lemon juice and rose water.
6.To the lid fix the wheat dough and cover the biryani pot to create dum or pressure.The total time required will be around 40 min.So first cook on high flame for 5 min,then slow flame cook for about 15 min and then place tava or flat frying pan and on top of it place the biryani pot and cook again on slow flame for more 10 min.After 10 min switch of the flame and let the biryani rest for more 10 min.
7.Remove the dough and open the lid,you will find beautiful biryani resting for us to gobble.
8.Here comes the out come of your total hard work and patience level. Isn't it yum.
 Thank you for Visiting My Blog Cocinanispolina.


Do follow me on Facebook Page :@cocinanispolina
On Instagram : @cocinanispolina

Do share your comments and feedback.Can also share the dish pic if you try recipe from my Blog.

Happy Cooking :)